среда, 5 октября 2016 г.

Background Posting in Microsoft Dynamics NAV

Background posting it's procedure wich transfers your completed document to NAS server and post it for you. Background posting uses job queue and in Microsoft Dynamics NAV.


Background posting covers both the sales and the purchase side and has been implemented for the following areasSales OrderSales Invoice,  Sales Credit MemosSales Return OrderPurchase   OrderPurchase InvoicesPurchase Credit Memos and Purchase Return Order.


   Set Up Background Posting for Sales Area

    The first step is to set up a job queue to run the background posting


  1. In the Job Queue Category List, you create a new job queue category (or select standart the SalesPost category). In our example it TEST category. In the next part you will see why should we use it.


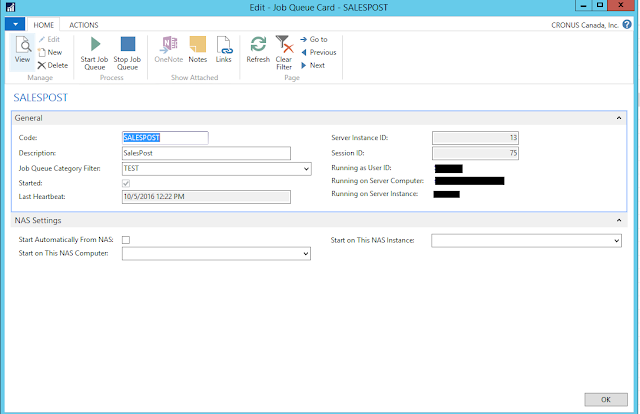
    2. In the Job Queue card create a new Job Queue. Fill Code and Description fields and choose Job queue category which created before. So this job will only run the job queue entries with the               category TEST. Remaining fields in the GeneralFastTab show the status of the job queue.


    It is possible to choose which Nas service the job queue must run on in the NAS Settings FastTab


    The next step is to set up the background posting, in this case, the sales side

  1. On the Sales & Receivables Setup page we select  Background Posting FastTab
  2.         You activate background posting for sales documents by selecting the Post with Job Queue check box.
  3.   .   Job Queue priority is that if you have several job queue it post one after another depend on higher priority. Max priority = 1000.
  4.        To filter to the sales order type of job queue entry, choose the Job Queue Category Code field.   When you choose this category, you are filtering to all sales orders that match any job queue that has the same category code.
  5.         Activate the Notify On Success check box if you want the user that posted the document to notified about the state of posting. There will be a notification attached to the posted document as well as a notification in the My Notifications part on the role center.


     And if you need You can apply the same steps to the Purchases & Payables Setup page

     Now, the application has been configured and it is possible to start posting.


      Running background posting


     1. Create new sales order

     2. In FastTab Lines fill Qty. to Ship, Qty. to Invoice (it depend on your intentions). If don't fill this fields have such error: "There is nothing to post"

     3. Click Post and see such message


     In the Sales order list it is possible to see the state of posting showing the Job Queue Status field The list page will show the status of posting


   4. The My Job Queue part also shows the progress of the jobs. Any job queue errors will be readable from the entry in the job queue. Failing job queue entries are displayed in red, while the job queue entries in line are displayed in black. 

    After posting My Notifications part shows any errors related to the posting or successfull finished.


  5. And when selected Job Queue start all sales order will post.

  While you click post Job Queue create new Job Queue Entry Card of each one of document.

  All error with detailed information save in Job Queue Log Entries


   Since job queue  are used in background posting, following things can be achieved,
  1. Can run many job queues with selection criteria per company
  2. Can run more than one job queue on the server at the same time
  3. Jobs will run with the user's permission and no special security is required.


вторник, 4 октября 2016 г.

Microsoft Dynamics NAV for Mobile Devices

Microsoft Dynamics NAV for Mobile Devices

From the very beginning of the investigation it's important to define what Microsoft Dynamics NAV for mobile devices is.In Microsoft documentation there is mentioned such an appellation as Microsoft Dynamics NAV Universal App. This is the common name for the NAV app across all devices.


So Dynamics NAV Universal App includes:

  • Dynamics NAV Windows client
  • Dynamics NAV Web Client
  • Dynamics NAV Tablet Client
  • - Dynamics NAV Phone Client


As shown on the schema above Dynamics NAV Tablet Client and Dynamics NAV Phone Client are included to NAV for mobile devices.

It’s important to know that mobile clients have being available since NAV 2015 version was released.
Dynamics NAV Tablet and Phone Clients are released for different operation systems:

  • Windows (Windows Store)
  • Android (Google Play)
  • - iOS (App Store)

NAV can be downloaded from these stores absolutely free.

Looking ahead it’s important to say that Dynamics NAV Tablet and Phone Clients can not support networks with domains. So if your NAV server is in domain it will be impossible to log in. To solve this issue your system administrator should start Device Registration Service which is available on Windows Server 2012 R2. Also system administrator should install special certificate on your mobile device.
This issue concerns Android, iOSs and Windows.


How to make it work

To make your NAV database available on your mobile device you should set up Dynamics NAV Web Client.There are several steps to do it:

1. Choose the database to work with.

2. Add and start an NAV Server instance to chosen database.

3. Install Web Server Components (if not installed already).
To install Web Server Components you should run NAV setup file. Then click on “Add or remove components”. In next window you should make Web Server Components available.Then click "Next" and follow the installation instructions.


4. Add a NAV web server instance.
When all necessary components are set up NAV web server should be run. To reproduce it follow next steps (information from msdn.microsoft.com):

4.1. On the computer or virtual machine that is running Microsoft Dynamics NAV Server, run Microsoft Dynamics NAV Administration Shell as an Administrator.
Choose Start, in the Search box, type Microsoft Dynamics NAV Administration Shell.
Right-click the related link, and then choose Run as Administrator.
4.2. At the command prompt, type command in the following format:
New-NAVWebServerInstance -WebServerInstance <MyWebApp> -Server <NAVServer> -ServerInstance <NAVServerInstance> -ClientServicesCredentialType <NAVCredentialType>
Example:
New-NAVWebServerInstance -WebServerInstance MyNavApp –Server MyNavServer –ServerInstance DynamicsNAV90 –Company MyNavCompany -ClientServicesCredentialType NavUserPassword
Addition information is here.

5. Run NAV Web Client.
To run a NAV Web Client you should run your browser and type string in a next format to address field:
http://ComputerName:Port/WebServerInstance/WebClient
Example:
http://MyNAVWeb:8080/DynamicsNAV90/WebClient

6. Run NAV Tablet or Phone Client.
So if Web Client opens without errors you can start with overview of Tablet and Phone client. If you have downloaded NAV for your Windows, Android or iOS phone you can log in with your mobile device. If not, you can just see how these clients look like with help of your browser. Fill in address field with links for tablet and phone accordingly:

http://MyNAVWeb:8080/DynamicsNAV90/WebClient/tablet.aspx


http://MyNAVWeb:8080/DynamicsNAV90/WebClient/phone.aspx 


There is quite big list of limitations in NAV Web, Tablet and Phone clients. You can find information about it here.

In conclusion we can say that NAV Tablet and Phone Clients do not replace NAV Windows or Web Clients, because NAV for mobile devices allows to run limited set of simple application scenarios. The main idea is to let user be online when he or she is out of desk.

понедельник, 19 сентября 2016 г.

The creation of the fields which are displayed in blue on the page

Plan

  • Creating an Add-in with Visual Studio.
  • Copying the Add-in Assembly to the Microsoft Dynamics Windows Client.
  • Registering the Add-in in Microsoft Dynamics NAV.
  • Setting Up the Add-in on a Page.


Creating an Add-in with Visual Studio

To create the add-in
1.      In Visual Studio, on the File menu, choose New, and then choose Project.
2.      Under Installed Templates, choose Visual C#, and then choose Class Library.
3.      In the Solution Name text box, enter the name of your solution. For example, you can enter MyCompany.MyProduct.RtcAddins and then choose the OK button.
Yow will add references to the following assemblies:
    1. Microsoft.Dynamics.Framework.UI.Extensibility.dll 
    2. System.Windows.Forms 
    3. System.Drawing 
4.      In Solution Explorer, right-click your project, and then choose Add Reference.
5.      In the Add Reference window, on the Browse tab, navigate to the location of the Microsoft.Dynamics.Framework.UI.Extensibility.dll assembly on your computer and then choose the OK button. By default, the path of the assembly is C:\Program Files (x86)\Microsoft Dynamics NAV\90\RoleTailored Client.
6.      In Solution Explorer, choose Reference, and on the shortcut menu, choose Add Reference.
7.      In the Add Reference window, choose the .NET tab, then under Component Name, choose System.Windows.Forms, and then choose theOK button.
The namespace contains classes for creating user interfaces for Windows-based applications.
8.      Repeat the previous step and add a reference to the System.Drawing namespace. This namespace provides access to basic graphics functionality.
9.      Open the Class1.cs file and add the following using directives.
10. In the ClassLibrary1 namespace, add the following code to declare a new class named MyFieldPopupAddin for the add-in.
11. In the MyFieldPopupAddin class, add the following code to implement the abstractMicrosoft.Dynamics.Framework.UI.Extensibility.WinForms.WinFormsControlAddInBase.CreateControl method and define the add-in functionality.

An assembly must be signed that can be used in the Microsoft Dynamics NAV Windows client. You will now sign the assembly.

To sign the assembly

1.      In Visual Studio, on the Project menu, choose MyCompany.MyProduct.RtcAddins properties.
2.      In the Properties window, choose Signing, and then select the Sign the assembly check box.
3.      In the Choose a strong name key file drop-down list, select New.
4.      In the Key file name text box, enter RtcAddins and clear the Protect my key file with a password check box.
In this walkthrough, you will not protect the key file with a password. However, you can choose whether to use a password. For more information, see Strong-Name Signing for Managed Applications.
5.      Choose the OK button.
6.      In Solution Explorer, choose the Class1.cs file to open it. Notice the RtcAddins.snk file that is added in Solution Explorer.
7.      On the Build menu, choose Build <Your Solution> to build the project. Verify that the build succeeds. In this example, your solution is MyCompany.MyProduct.RtcAddins.

Copying the Add-in Assembly to the Microsoft Dynamics Windows Client


After you build the add-in, you copy the output assembly file to the computer that is running the Microsoft Dynamics NAV Windows client.

To copy the add-in assembly to the Microsoft Dynamics NAV Windows client

1.      On the development computer, locate and copy the add-in assembly file (.dll file) in the add-in project's output folder.
By default, this folder is C:\ Documents\Visual Studio\Projects\[Your Addin Project]\[Your Class Library]\bin\Debug. In this case, the location of the assembly is C:\ \Documents\Visual Studio 2012\Projects\MyCompany.MyProduct.RtcAddins\ MyCompany.MyProduct.RtcAddins\bin\Debug.
2.      On the computer that is running the Microsoft Dynamics NAV Windows client, paste the assembly in the Microsoft Dynamics NAV Windows client\Add-ins folder in the Microsoft Dynamics NAV 2016 installation folder.
By default, the path of this folder is C:\Program Files (x86)\Microsoft Dynamics NAV\90\RoleTailored Client\Add-ins.

Registering the Add-in in Microsoft Dynamics NAV


To register an add-in, you include it on the Control Add-ins page in Microsoft Dynamics NAV. To include an add-in on the page, you must provide the following information:
  •       Control Add-in name.
The control add-in name is determined by the Microsoft.Dynamics.Framework.UI.Extensibility.ControlAddInExportAttribute attribute value of add-in class definition that you specified when you created the control add-in. The name in this walkthrough isMyCompany.MyProduct.FieldPopupAddin, as shown in the following code snippet from interface definition.

  •      Public key token.
To determine the public key token for the add-in
1.      On the Windows taskbar, choose Start, choose All Programs, choose Microsoft Visual Studio 2012, choose Visual Studio Tools, and then choose Visual Studio Command Prompt (2012) to open the command prompt.
2.      At a command prompt, change to the directory that contains the assembly that you copied.
For example, C:\Program Files (x86)\Microsoft Dynamics NAV\90\RoleTailored Client\Add-ins.
3.      Type the following command.
4.      sn -T <assembly>
Replace <assembly> with the assembly name, such as ClassLibrary1.dll.
5.      Press Enter and note the public token key that is displayed.

      To include the add-in on the Control Add-ins page

1.      In the Microsoft Dynamics NAV Windows client, in the Search box, enter Control Add-ins, and then choose the relevant link.
2.      On a new row, in the Control Add-ins page, enter the Control Add-in name, and the Public Key Token.
In this walkthrough, the add-in name is MyCompany.MyProduct.FieldPopupAddin.
3.      Choose the OK button to close the Control Add-ins page.

Setting Up the Add-in on a Page


In this section, you will modify the Customer Card page to use the new add-in on the name field. This involves the following tasks:
  •     Setting the ControlAddin Property of the field to the add-in.
  •     Setting the OnControlAddin Trigger.
In the C/AL Editor, you set the trigger that is called when a user selects the field to open a pop-up window. When a field is double-clicked, the add-in raises the Microsoft.Dynamics.Framework.UI.Extensibility.IEventControlAddInDefinition.ControlAddIn event, which in turn calls the trigger.

To set the ControlAddIn property on the field

1.      In Microsoft Dynamics NAV, in Object Designer, choose Page.
2.      Select page 21, Customer Card, and then choose Design.
3.      In the Page Designer, in the Name column, select the Name field, and then on the View menu, choose Properties.
4.      In the <Name> Properties window, in the Property column, locate ControlAddIn.
5.      In the Value column, choose the up arrow, and then select MyCompany.MyProduct.FieldPopupAddin from the Client Add-in window. Choose the OK button to close the Client Add-Ins window. The public key token is inserted into the Value field.
6.      Close the Properties window.
7.  On the File menu, choose Save, select the Compiled check box, and then choose the OK button.
8.      Close the C/AL window.

To test the add-in

1.      In Object Designer, choose Page. In the Name column, select the Customer Card page, and then choose Run. The customer card view is displayed. Notice the color of the Name field.

вторник, 12 января 2016 г.

User Permissions and Permission Sets

There are Permission Sets for different users in RTC.
Administration -> IT Administration -> General -> Users, Permission Sets

There are 3 main Sets, which already exist: Super, Super (data), Basic.

If User has no permissions, he will not open RTC. Minimum Permission Set must be Basic. Then Admin cusomizes additional Sets. Only Super does not need some more Set.

Basic allows to run RTC and to open almost all pages.

Super includes absolutely all actions in all areas. It is impossible to edit this Set.

Super (Data) - this user can manage only data area: to create/edit/delete/post/setup data. This user does not have acces only to Administration -> IT Administration. Application Setup area available for editing. It requires additionally Basic Set.

If there is no user in database, everybody can open RTC and can do any action.

You can create your own Permission Sets and customize permissions.

Let`s create Permission Set: New -> Permission Set, Name -> button Permissions -> you can choose from All Permissions or you can do it through the button New.
There are such permission types: read, insert, modify, delete, execute, security filter.
You can choose Yes or Indirect or leave empty.
* if empty - the is no permission;
* if Yes - direct acces to the object;
* if Indirect - indirect acces to the object: ex., user can not open the table, but he can see data from this table on the appropriate page (if he has permission Yes for this page);
* if you can not edit permissions by types (Yes or Indirect) on the page, you can open the table from the Object Designer and edit data in the table.
There is a list of editable/not_editable values regarding the type of object:
** Table Data: Read, Insert, Modify, Delete - editable, Execute - not, Security Filter - editable.
** тип Table: Read, Insert, Modify, Delete - not, Execute - editable, Security Filter - not.
** тип Report: Read, Insert, Modify, Delete - not, Execute - editable, Security Filter - not.
** тип Codeunit: Read, Insert, Modify, Delete - not, Execute - editable, Security Filter - not.
** тип XMLport: Read, Insert, Modify, Delete - not, Execute - editable, Security Filter - not.
** тип MenuSuite: Read, Insert, Modify, Delete - not, Execute - editable, Security Filter - not.
** тип Page: Read, Insert, Modify, Delete - not, Execute - editable, Security Filter - not.
** тип Query: Read, Insert, Modify, Delete - not, Execute - editable, Security Filter - not.
** тип System: Read, Insert, Modify, Delete - not, Execute - editable, Security Filter - not.
* if the user has two mutually exlusive (both Yes and Indirect or empty) permissions, the priority will have the value Yes;
* Security Filter - allows to resrtict acces to the data, is active only for Object Type = Table Data (ex. it is possible to specify that the user can see information about only one Customer but not about other Customers). On every table there is it`s own set of filters;
* if the field Object ID has a value 0 (zero), permissions will be set for all of object of selected type (ex. Table, Report etc).

Function Copy Permission Set - copy the existing one, creating a new set. You can add, modify and delete permissions while creating new set with this function.

You can import excel-file with needed permissions. For this you need to have the corresponding file with mapping. I will tell about exporting, editing and importing the file.
Administration -> Application Setup -> RapidStart Services for Microsoft Dynamics NAV -> Configuration Packages.
Create new Pakage. Insert there two lines: 2000000004 Permission Set and 2000000005 Permissions.
Export: Actions -> Export to Excel.
Edit file: create Permission Set, add permissions.
Import back into the same package, of which we export.
New Permission Set is created.

You can create and edit permissions and Permission Sets in the tables - 2000000005 Permissions and 2000000004 Permission Set, which are run from Object Designer.

понедельник, 4 января 2016 г.

How to create Rental Order (addon Armada Dynamics EQM)

Rental Order is creating from Rental Contract.
Rental Contract can be created singly or it can be created from Rental Quote.
I`ll discribe the way from the Rental Quote.

(all setups for user access are configured: User Setup -> EQM User=yes)
1. New - Rental Quote (can be filled in 2 ways):
1.1. Customer No:
1.1.1. fill header fields: Quote No, Customer No - all needed data is validated.
1.1.2. fill line fields: Type (ex., Item), No - all needed fields are validated (if Item has all necessary settings; if smth is missed - set up on Item Card), Qty to Ship (automatically fills Quantity Orig.).
1.2. Customer Template Code:
1.2.1. fill header fields: Quote No, Customer Template Code, Contact No (it is important: Evaluation Status of Contact must not be For Evaluation).
1.2.2. fill line fields - see p.1.1.2.

2. Home/Actions -> Make Contract - Rental Contract is created, open it.

3. Rental Contract:
3.1. If Contract is created from Quote with Customer No (p.1.1), the field Invoice Sequence on tab Invoice Details is filled automatically (if data is filled on the Customer Card).
3.1.1. Home/Actions -> Sign Contract - we have Status=Signed.
3.1.2. after that we shoul deliver lines (before signing we can not deliver lines): Actions -> Delivary -> Deliver All/ Deliver Line - on the lines we have Entry Status = Delivered. Now the button Create Rental Order is active.
3.1.3. Home/Actions -> Create Rental Order - the butchjob is running and creating Rental Order.
3.2. If Contract is created from Quote with Customer Template Code (p.1.2.), the field Invoice Sequence on tab Invoice Details should be filled manually.
Repeate poits 3.1.1-3.1.3.

How to change Evaluation Status on Contact Card:
Contact Card -> tab Evaluation
Evaluation Status has 3 points: For Evaluation, Positive Evaluation, Negative Evaluation.
When you change status, you get error: Evaluation Status cannot be changed because there are no entries in the question list.
Navigate -> Tasks -> Evaluation -> fill Question, Answer.

So now you can change Evaluation Status.